


Insert Text in Word 2010
In this chapter, we will discuss how to insert text in Word 2010. Many times it is required to go back and insert additional text in an existing line. Microsoft Word provides two ways to insert text in existing text and we will show how to use both the methods of inserting text −
Insert and Add Text
First, we will see how the inserted text will be added into the existing content without replacing any existing content.
Step 1 − Click the location where you wish to insert text; you can also use the keyboard arrows to locate the place where the text needs to be inserted.
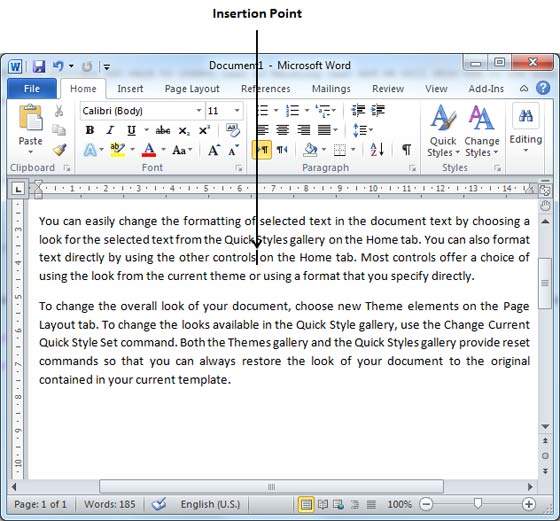
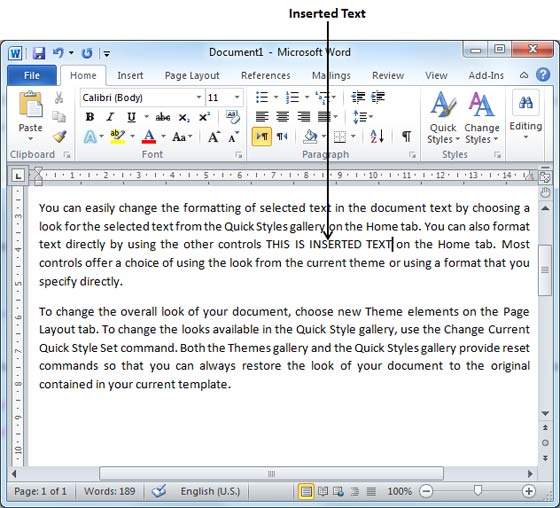
Step 2 − Start typing the text that needs to be inserted. Word inserts the text to the left of the insertion point, moving the existing text to the right
Insert and Replace Text
In the Insertion mode, text will be added into the existing content but same time it will over write all the content which comes in its way.
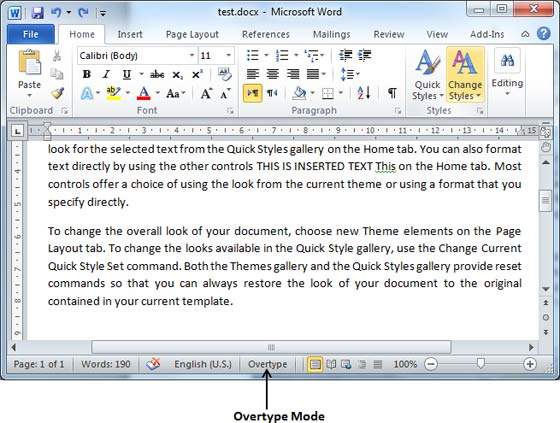
Step 1 − Right-click the status bar and select the Overtype option from the displayed menu.
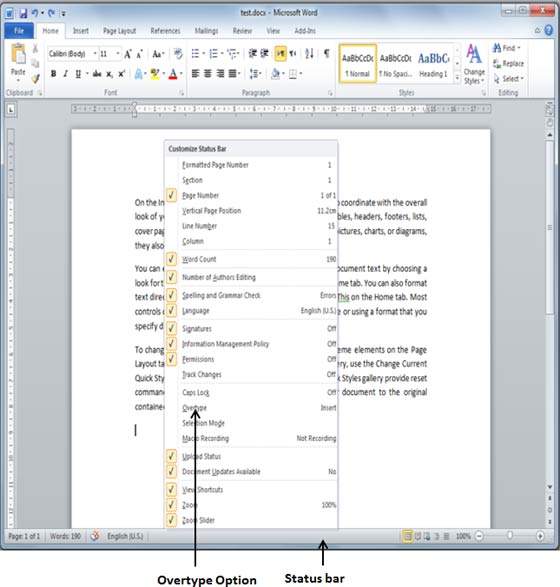
When you select the Overtype option, the status bar will show the insert mode as shown below −
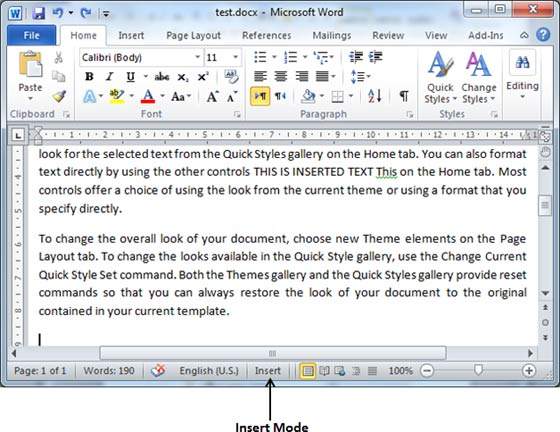
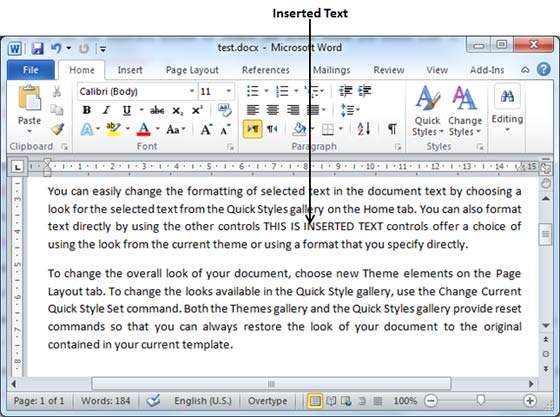
Step 2 − Click on the Insert text available at the status bar and it will switch to the Overtype mode as shown below −
Step 3 − Now click the location where the text needs to be inserted or you can use the keyboard arrows to locate the place where the text needs to be inserted.
Step 4 − Start typing the text that needs to be inserted. Word will replace the existing text with the newly typed text without moving the position of the exiting test.
Note − Microsoft Word 2010 disabled the functionality of the Insert key and it does nothing, so you will have to follow-up with the above-mentioned procedure to turn-on or turn-off the Insert mode.
Select Text in Word 2010
In this chapter, we will discuss how to select text in Word 2010. Selecting a text is one of the most important skills required while editing a word document. You can perform various operations on a selected text; you can delete the selected text, copy it, move it, apply formatting to it, change its capitalization, etc.
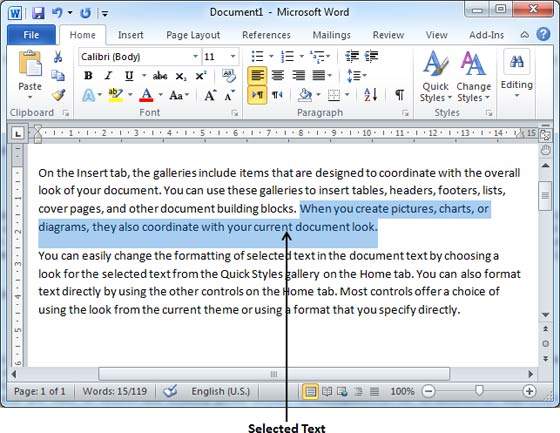
The most common method of selecting a text is to click and drag the mouse over the text you want to select. Following table lists down a few other simple methods that will help you in selecting text in different scenarios −
| S.No | Component & Selection Method |
|---|---|
| 1 |
Selecting text between two points
Click at the start of the block of text, hold down Shift, and click at the end of the block.
|
| 2 |
Selecting a single word
Double-click anywhere on the word you want to select.
|
| 3 |
Selecting a paragraph
Triple-click anywhere on the paragraph you want to select.
|
| 4 |
Selecting a sentence
Hold down the Ctrl key and click anywhere in the sentence you want to select.
|
| 5 |
Selecting a column of text
Hold down Alt, click and hold the mouse button, and drag over the column you want to select.
|
Note that only one part of the document can be in the selected state. If you have one portion of the document in the selected state and as soon as you try to select any other part of the document, the previous part will automatically be de-selected.
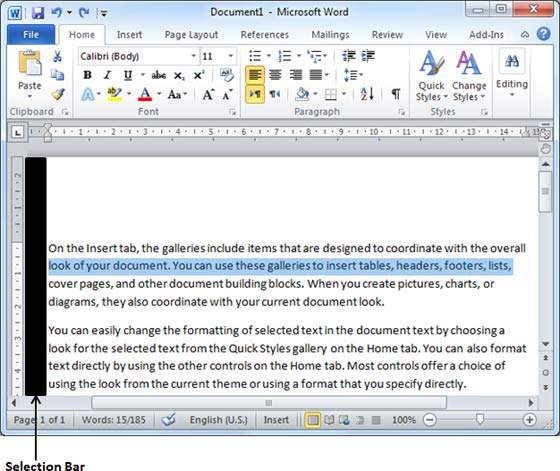
Using the Selection Bar
The black shaded area in the following screenshot is called the selection bar. When you bring your cursor in this area, it turns into a rightward-pointing arrow.
You can use the selection bar to select the various components of a document as described in the following table −
| S.No | Component & Selection Method |
|---|---|
| 1 |
Selecting a line
Bring your mouse in the selection bar area and click in front of the line you want to select.
|
| 2 |
Selecting a paragraph
Bring your mouse in the selection bar area and double click in front of the paragraph you want to select.
|
| 3 |
Selecting the document
Bring your mouse in the selection bar area and triple-click.
|
Using the Keyboard
Keyboard provides very good support when you want to select various components of the document as described in the following table −
| S.No | Key & Selection Method Selecting Text |
|---|---|
| 1 |
Ctrl + A
Press Ctrl + A keys to select the entire document.
|
| 2 |
Shift
Keep pressing the Shift key and use any of the arrow keys to select the portion of the text.
|
| 3 |
F8
Press F8 and then use any of the arrows keys to select the portion of the text.
|
| 4 |
Ctrl + Shift + F8
Press Ctrl + Shift + F8 and then use any of the arrows keys to select the column of the text.
|
Delete Text in Word 2010
In this chapter, we will discuss how to delete text in Word 2010. It is very common to delete text and retype the content in your Word document. You might type something you did not want to type or there is something extra that is not required in the document. Regardless of the reason, Word offers you various ways of deleting the text in partial or complete content of the document.
Using Backspace & Delete Keys
The most basic deletion technique is to delete characters one at a time by pressing either the backspace key or the delete key. The following table describes how you can delete a single character or a whole word by using either of these two keys −
| S.No | Keys & Deletion Methods |
|---|---|
| 1 |
Backspace
Keep the insertion point just after the character you want to delete and press the Backspace key. Word deletes the character immediately to the left of the insertion point.
|
| 2 |
Ctrl + Backspace
Keep the insertion point just after the word you want to delete and press Ctrl + Backspace key. Word deletes the whole word immediately to the left of the insertion point.
|
| 3 |
Delete
Keep the insertion point just before the character you want to delete and press the Delete key. Word deletes the character immediately to the right of the insertion point.
|
| 4 |
Ctrl + Delete
Keep the insertion point just before the word you want to delete and press Ctrl + Delete key. Word deletes the word immediately to the right of the insertion point.
|
Using Selection Method
You have learned how to select various parts of a Word document. You can make use of that learning to delete those selected parts as described in the following table −
| S.No | Component Selection & Delete Methods |
|---|---|
| 1 |
Deleting text between two points
Click at the start of the block of text, hold down the Shift key, and click at the end of the block to select the portion of text and finally press either the Backspace key or the Delete key.
|
| 2 |
Deleting a single word
Double-click anywhere on the word you want to delete and finally press either the Backspace key or the Delete key.
|
| 3 |
Deleting a paragraph
Triple-click anywhere on the paragraph you want to delete and finally press either the Backspace key or the Delete key.
|
| 4 |
Deleting a sentence
Hold down the Ctrl key and click anywhere in the sentence you want to delete and finally press either the Backspace or the Delete key.
|
| 5 |
Deleting a column of text
Hold down the Alt key, click and hold the mouse button, and drag over the column you want to delete and finally press either the Backspace key or the Delete key.
|
| 6 |
Deleting a line
Bring your mouse in the selection bar area and click in front of the line you want to delete and finally press either the Backspace key or the Delete key.
|
| 7 |
Deleting entire document content
Press Ctrl + A keys to delete the entire document and finally press either the Backspace key or the Delete key.
|
Note − The black shaded area in the following screenshot is called the selection bar. When you bring your cursor in this area, it turns into a rightward-pointing arrow.
Move Text in Word 2010
In this chapter, we will discuss how to move text in Word 2010. At times, it is required to move a text from one location to another location in the same document or in any other document. You can move text from one location in a document to another by using the drag-and-drop technique with the help of a mouse. This tutorial will teach you how to use the drag and drop technique to move text.
Move within the same document
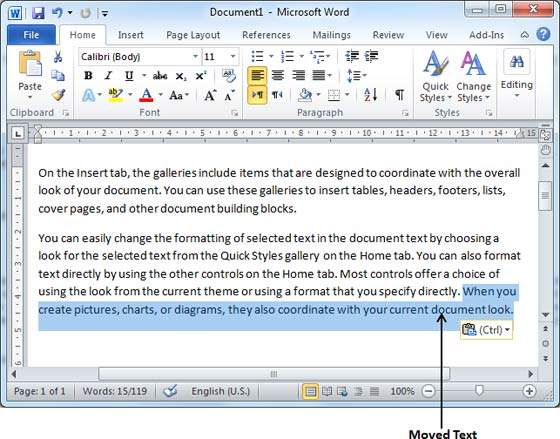
Step 1 − Select a portion of the text using any of the text selection methods.
Step 2 − Now take your mouse pointer over the selected text and hold the left button of the mouse and keep holding it while moving around the document.
Step 3 − Take your mouse pointer to the place where you want to move the selected text and release the mouse button. You will see that the selected text is moved to the desired location.
Move within different documents
You can move the selected text from one document to another document. The following are some simple steps that will help you in moving text from one document to another document.
Step 1 − Keep both the documents opened and to ensure that both documents are visible, click the Arrange All button on the View tab on the Ribbon.
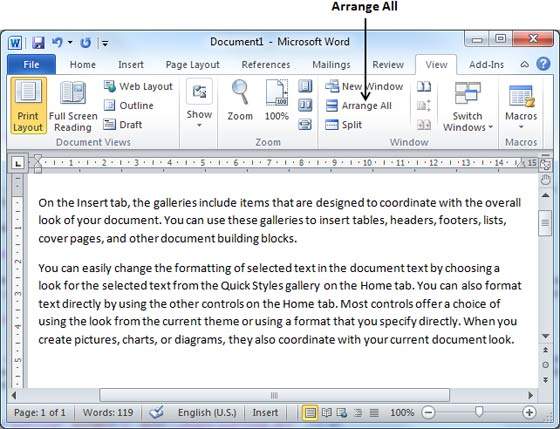
This will display both the documents as shown below −
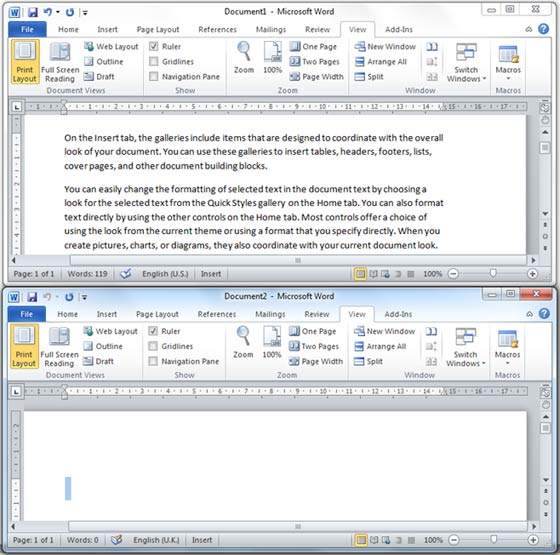
Step 2 − Now, select a portion of the text using any of the text selection methods.
Step 3 − Take your mouse pointer over the selected text and hold the left button of the mouse and keep holding it while moving around the document.
Step 4 − Take your mouse pointer at the place in the second document where you want to move the selected text and release the mouse button. You will see that the selected text is moved to the desired location in the second document.
Note − In case you have more than two documents, you can use the Alt + Tab keys to switch through the different documents and select the desired destination document.
Copy & Paste in Word 2010
In this chapter, we will discuss how to copy, cut, and paste in Word 2010. In the previous chapter, we understood how we can select the desired text and move it to any other location in the same document or in any other document. This tutorial will teach you how to use copy, cut, and paste techniques to duplicate a text leaving the original text intact or removing the original text completely.
To use copy and paste or cut and paste operations, Word makes use of a temporary memory which is called the clipboard. When you copy or cut a text, it stays on the clipboard temporarily and in the second step, you can paste this content at the desired location.
Copy & Paste Operation
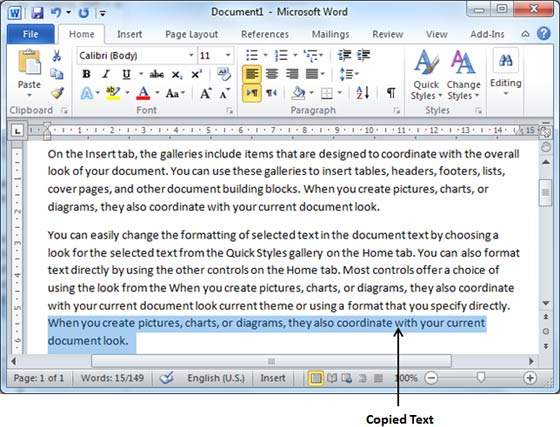
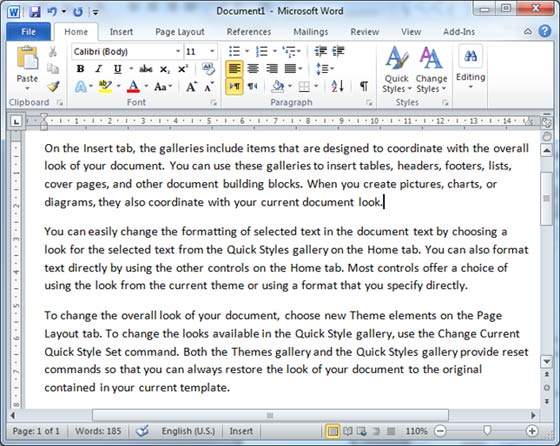
The Copy operation will just copy the content from its original place and create a duplicate copy of the content at the desired location without deleting the text from its original location. Following is the procedure to copy the content in a word −
Step 1 − Select a portion of the text using any of the text selection methods.
Step 2 − You have various options available to copy the selected text in the clipboard. You can make use of any one of the options −
- Using Right-Click − When you right-click on the selected text, it will display the copy option, click this option to copy the selected content in the clipboard.
- Using Ribbon Copy Button − After selecting the text, you can use the copy button available at the ribbon to copy the selected content in the clipboard.
- Using Ctrl + c Keys − After selecting a text, just press Ctrl + c keys to copy the selected content in the clipboard.
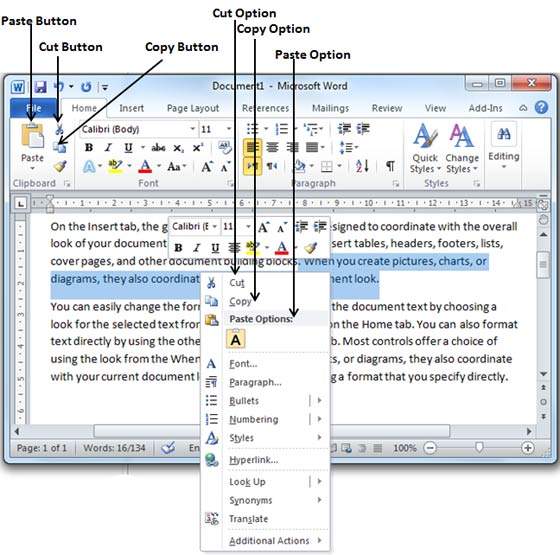
Step 3 − Finally click at the place where you want to copy the selected text and use either of these two simple options −
- Using Ribbon Paste Button − Just click the Paste button available at the ribbon to paste the copied content at the desired location.
- Using Ctrl + v Keys − This is the simplest way of pasting the content. Just press Ctrl + v keys to paste the content at the new location.
Note − You can repeat the Paste operation as many times as you like to paste the same content.
Cut & Paste Operation
The Cut operation will cut the content from its original place and move the content from its original location to a new desired location. Following is the procedure to move the content in a word −
Step 1 − Select a portion of the text using any of the text selection methods.
Step 2 − Now, you have various options available to cut the selected text and put it in the clipboard. You can make use of one of the options −
- Using Right-Click − If right-click on the selected portion of text, it will display cut option, just click this option to cut the selected content and keep it in the clipboard.
- Using Ribbon Cut Button − After selecting a portion of the text, you can use the cut button available at the ribbon to cut the selected content and keep it in the clipboard.
- Using Ctrl + x Keys − After selecting a portion of the text, just press Ctrl + x keys to cut the selected content and keep it in the clipboard.
Step 3 − Finally, click at the place where you want to move the selected text and use either of these two simple options −
- Using Ribbon Paste Button − Just click the Paste button available at the ribbon to paste the content at the new location.
- Using Ctrl + v Keys − This is the simplest way of pasting the content. Just press Ctrl + v keys to paste the content at the new location.
Note − You can repeat the Paste operation as many times as you like to paste the same content.
Copy, Cut & Paste in different documents
You can use the same procedure that we discussed above to copy and paste or cut and paste content from one document to another document. This is very simple, just copy or cut the desired content from one document and go into another document where you want to paste the content and use the mentioned step to paste the content.
You can use the Alt + Tab keys to switch through the different documents and select the desired destination document.
Find & Replace in Word 2010
In this chapter, we will discuss the Find and Replace operation in Word 2010. While working on editing a document you come across a situation very frequently when you want to search a particular word in your document and many times you will be willing to replace this word with another word at a few or all the places throughout the document. Here, we will understand how to find a word or phrase in a word document and how to replace an existing word with any other word using simple steps.
Find Command
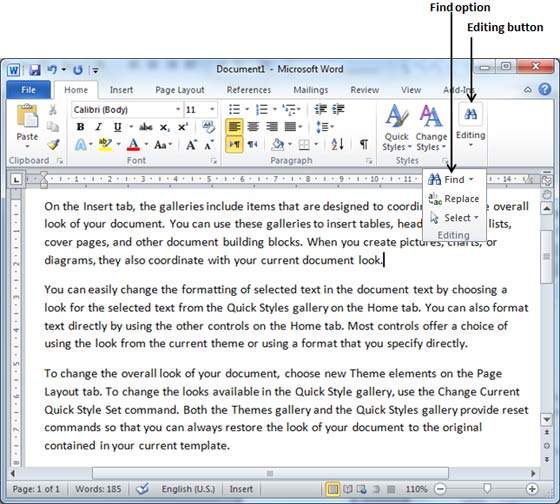
The Find command enables you to locate specific text in your document. Following are the steps to find a word document in the following screen −
Step 1 − Let us work out on a sample text available in our Word document. Just type =rand() and press Enter; the following screen will appear −
Step 2 − Click the Find option in the Editing group on the Home tab or press Ctrl + F to launch the Navigation pane −
Step 3 − Enter a word which you want to search in the Search box, as soon as you finish typing, Word searches for the text you entered and displays the results in the navigation pane and highlights the word in the document as in the following screenshot −
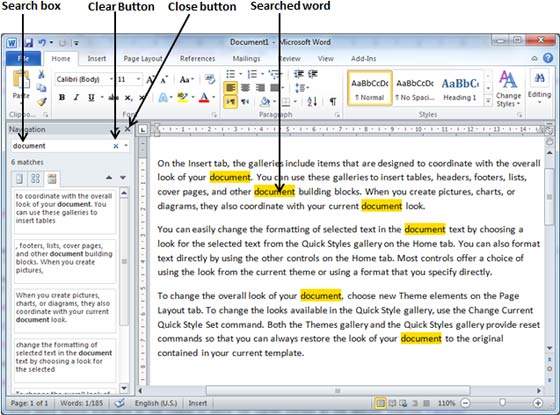
Step 4 − You can click the clear button (X) to clear the search and results and perform another search.
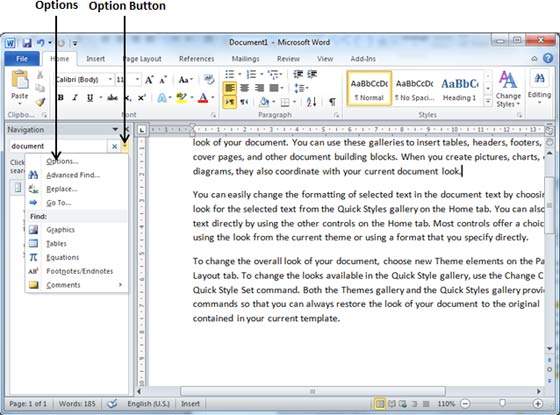
Step 5 − You can use further options while searching for a word. Click the options button to display the options menu and then click the Options option; this will display a list of options. You can select the options like match case to perform a case-sensitive search.
Step 6 − Finally, if you are done with the search operation, you can click the close button (X) to close the Navigation Pane.
Find & Replace Operation
We assume you are an expert in searching a word or phrase in a word document as explained above. This section will teach you how you can replace an existing word in your document. The following are the simple steps −
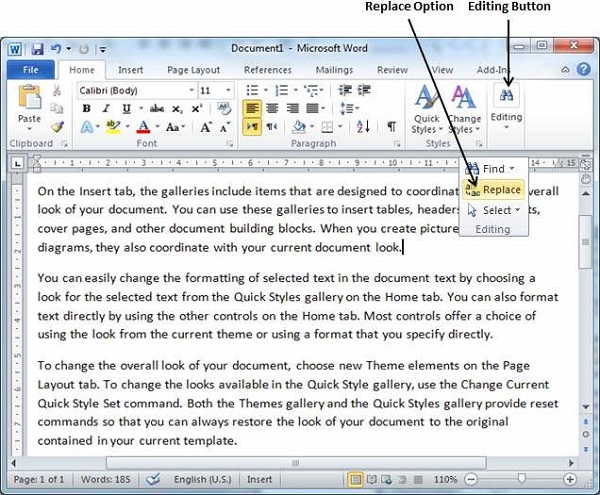
Step 1 − Click the Replace option in the Editing group on the Home tab or press Ctrl + H to launch the Find and Replace dialog box shown in Step 2 −
Step 2 − Type a word that you want to search. You can also replace the word using the Find and Replace dialog box as in the following screenshot −
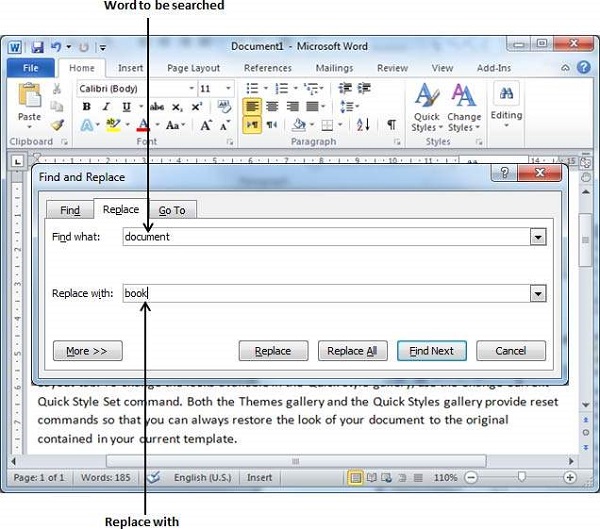
Step 3 − Click the Replace button available on the Find and Replace dialog box and you will see the first occurrence of the searched word would be replaced with the replace with the word. Clicking again on the Replace button would replace the next occurrence of the searched word. If you will click the Replace All button then it would replace all the found words in one go. You can also use the Find Next button just to search the next occurrence and later you can use the Replace button to replace the found word.
Step 4 − You can use the More >> button available on the dialog box to use more options and to make your search more specific like case sensitive search or searching for whole word only etc.
Step 5 − Finally, if you are done with the Find and Replace operation, you can click the Close (X) or Cancel button of the dialog box to close the box.
Spell Check in Word 2010
In this chapter, we will discuss how to check spelling and grammar in Word 2010. Microsoft Word provides a decent Spelling and Grammar Checker which enables you to search for and correct all spelling and grammar mistakes in your document. Word is intelligent enough to identify misspelled or misused, as well as grammar errors, and underlines them as follows.
- A red underline beneath spelling errors.
- A green underline beneath grammar errors.
- A blue line under correctly spelled but misused words.
Check Spelling and Grammar using the Review tab
Here is the simple procedure to find out the spelling mistakes and fix them −
Step 1 − Click the Review tab and then click the Spelling & Grammar button.

Step 2 − A Spelling and Grammar dialog box will appear and will display the wrong spellings or errors in grammar. You will also get suggestions to correct as shown below −
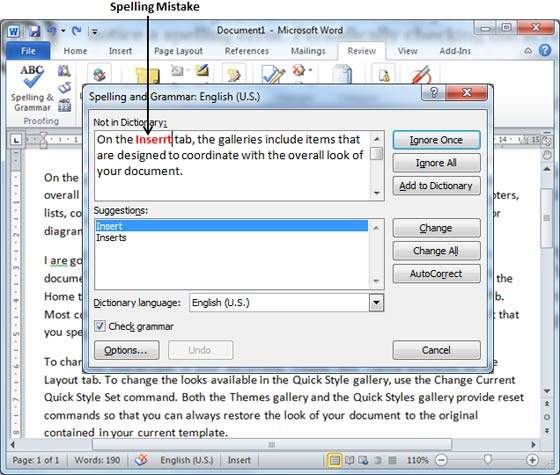
Now you have the following options to fix the spelling mistakes −
- Ignore − If you are willing to ignore a word, then click this button and Word ignores the word throughout the document.
- Ignore All − Like ignoring, but this ignores all occurrences of the same misspelling, not just once but throughout the document.
- Add to Dictionary − Choose Add to Dictionary to add the word to the Word spelling dictionary.
- Change − This will change the wrong word using the suggested correct word.
- Change All − Like Change, but this changes all occurrences of the same misspelling, not just once but throughout the document.
- AutoCorrect − If you select a suggestion, Word creates an AutoCorrect entry that automatically corrects this spelling error from now on.
Following are the different options in case you have a grammatical mistake −
- Next Sentence − You can click Next Sentence to direct the grammar checker to skip ahead to the next sentence.
- Explain − The grammar checker displays a description of the rule that caused the sentence to be flagged as a possible error.
- Options − This will open the Word Options dialog box to allow you to change the behavior of the grammar checker or spelling options.
- Undo − This will undo the last grammar changed.
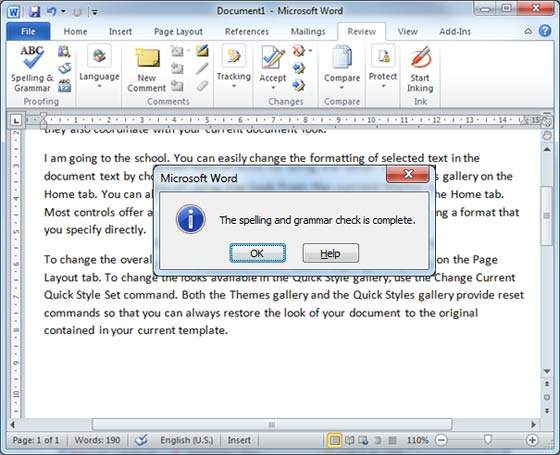
Step 3 − Select one of the given suggestions you want to use and click the Change option to fix the spelling or grammar mistakes and repeat the step to fix all the spelling or grammar mistakes.
Step 4 − Word displays a dialog box when it finishes checking for spelling and grammar mistakes, finally Click OK.
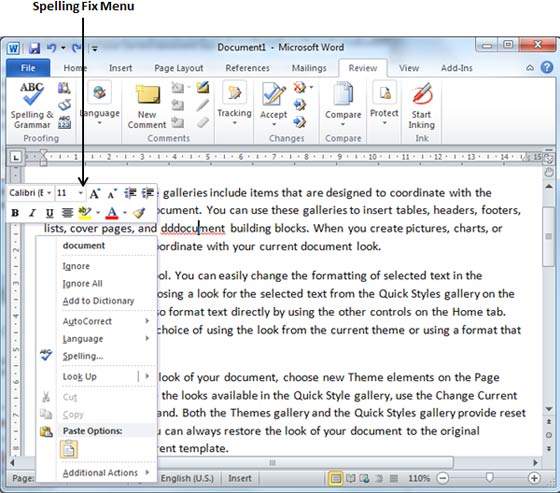
Check Spelling and Grammar using Right Click
If you will right-click the mouse button over a misspelled word, then it will show you the correct suggestions and the above-mentioned options to fix the spelling or grammar mistake. Try it yourself.
Zoom In-Out in Word 2010
In this chapter, we will discuss how to zoom in and zoom out in Word 2010. Microsoft Word provides functionality to apply zoom-in and zoom-out operations on a document. When we apply the zoom-in operation, it enlarges the size of text whereas applying the zoom-out operation reduces the size of the text.
A zoom operation just changes the size of the font on-screen without impacting any other attribute of the document. You can apply the zoom operation in various ways as explained in this chapter.
Zoom-in & Zoom-out using view tab
Here is the simple procedure to apply the zoom-in or the zoom-out operations using the View tab −
Step 1 − Click the View tab and then click the Zoom button as shown below.

Step 2 − When you click the Zoom button, a Zoom dialog box will appear as shown below. This will display the zoom options box to select a value to reduce or increase the size of the document on-screen. By default, it will be 100%; you can select 200% to increase the size of the font or 75% to reduce the size of the font.
You can click the Many pages down arrow and select to display multiple pages.
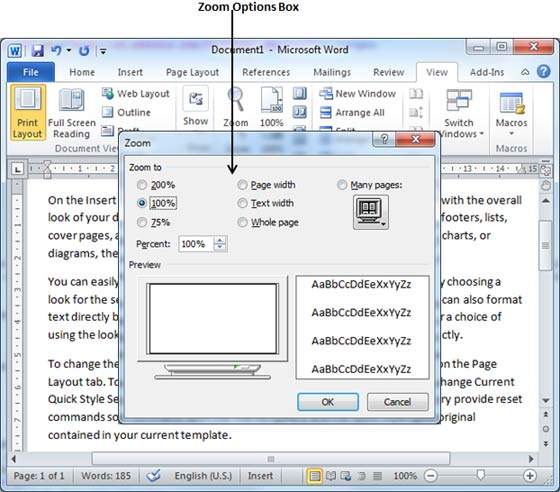
Step 3 − Once you are done with selecting an option, click OK to apply the changes on the document.
Step 4 − Try different options available, for example, Page Width and Text Width.
Zoom-in & Zoom-out using (+) and (-) Buttons
The following screenshot shows two buttons Zoom-out which is the (-) button and Zoom-in which is the (+) button.
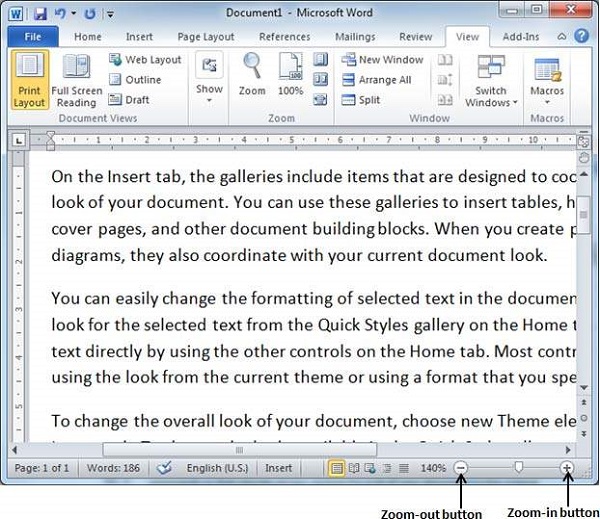
Step 1 − Click the Zoom-out button, you will find that your document size will decrease by 10% each time you click the button. Similar way, if you click on the Zoom-in button your document size will increase by 10% each time you click the button.
Step 2 − Try this simple operation with different values to see the difference. The above screenshot shows 140% zoom-in view of the document.
Special Symbols in Word 2010
In this chapter, we will discuss the use of special symbols in Word 2010. Your keyboard may not have many characters available but you want to use those characters in your document; in such situations, you have the option to insert Special Symbols the way we will further understand in this chapter.
To insert symbols that are occasionally used, follow the steps in this section. If you find yourself using a particular symbol frequently, you can assign a keyboard shortcut to it.
Insert Special Symbols
Here is a simple procedure to apply zoom-in or zoom-out operation using the View tab −
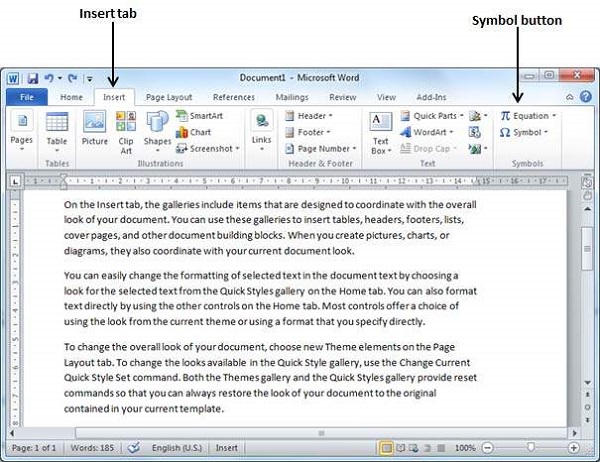
Step 1 − To insert a special symbol, bring your cursor at the place where you want to insert the symbol. Click the Insert tab. You will find two options under the symbol button (a) Equation and (b) Symbols. Click either of these two options based on your requirement. You will further use equations while preparing mathematical or scientific or any similar document. For now, we are going to understand the use of the Symbol button as shown below.
Step 2 − When you click the Symbol button, a small list of symbols will appear as shown below.
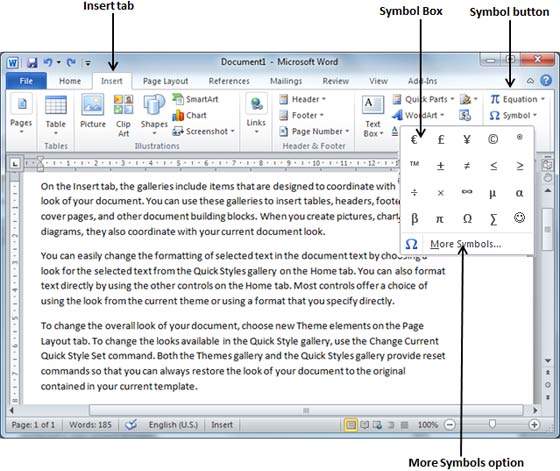
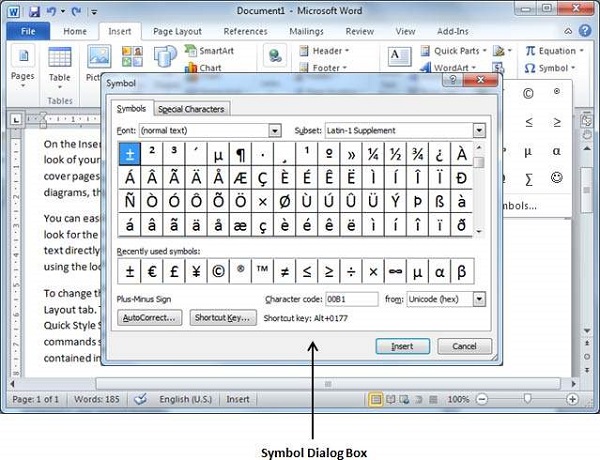
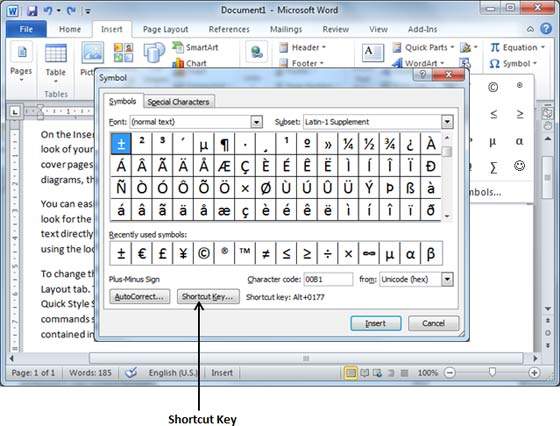
Step 3 − Now click on any of the available symbols in the box to insert that in your document at the selected location. If you do not find the desired symbol in this small box, then you can click at the More Symbols option to have a wide range of symbols as shown below in the symbol dialog box. You can select any of the symbols and then click the Insert button to insert the selected symbol.
Assign Shortcut Key
You can assign a keyboard shortcut to type any of the available symbols. Following are the steps to assign the Ctrl + Q key to insert the © symbol which is one of the available symbols in the special symbols list −
Step 1 − Assume you already have the following symbol dialog box opened.
Step 2 − Click the symbol for which a shortcut key needs to be assigned. Now click the Shortcut Key button which will display the following Customize Keyboard dialog box.
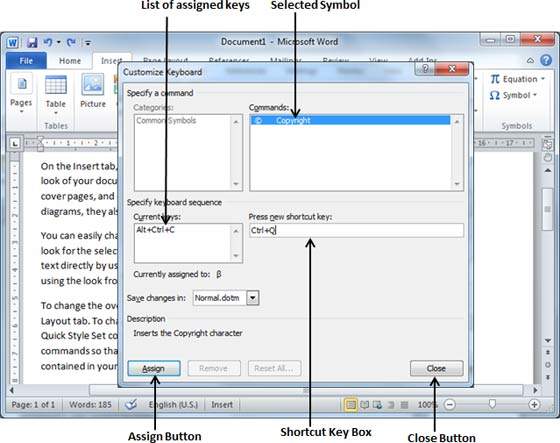
Step 3 − Now type the selected shortcut key in the shortcut key box. You press Ctrl + Q and then click the Assign button to assign the shortcut key. You will see that the selected key will be added to the list of assigned keys. Finally, use the Close button to close the dialog box.
Step 4 − Now try to type Ctrl + Q using the keyboard directly and you will find that you are able to type the © symbol without going into the symbol dialog box.
Undo Changes in Word 2010
In this chapter, we will discuss how to undo and redo changes in Word 2010. Microsoft word provides two important features called the Undo and the Repeat or Redo. The Undo feature is used to undo the previous action and the Repeat or Redo feature is used to repeat the previous action.
For example, if you mistakenly delete text, you can use the Undo feature to recover it. In a similar way, if you delete a character and you want to delete more characters then you can use the Repeat operation.
How to use Undo & Repeat operations
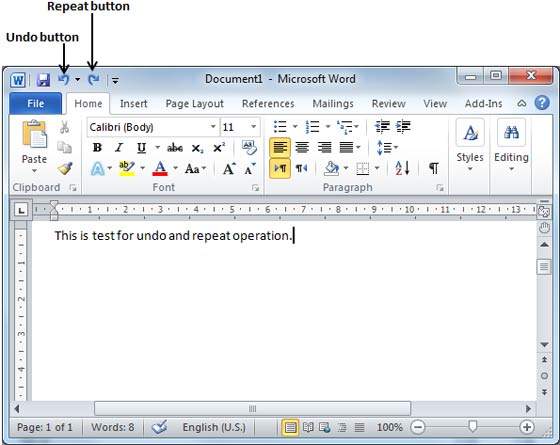
You can access the Undo and Repeat buttons from the Quick Access toolbar. You should make a note that the Repeat button is also called the Redo button and both the operations have the same meaning.
Here is the simple procedure to apply to undo or repeat (redo) operations −
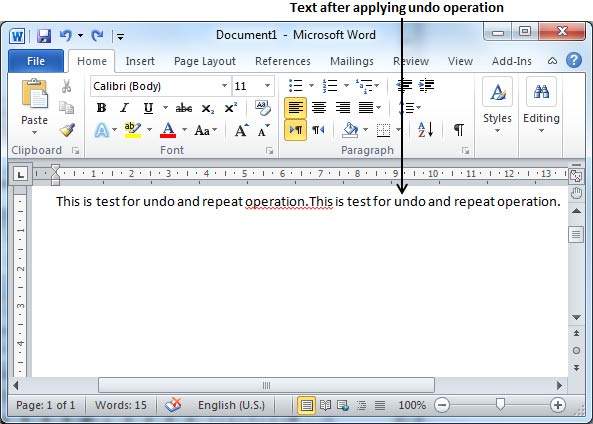
Step 1 − Let us type some text in a blank document. Now click the Repeat (Redo) button and you will see that Word will repeat the same operation for you.

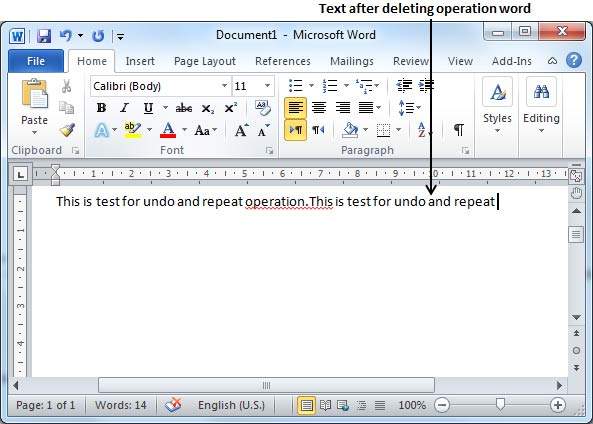
Step 2 − Now to examine the undo operation, let us delete the last word operation character by character so that you have the following text remaining in the line.
Step 3 − Let us try to click the Undo button one by one. You will see that Word will recover all the deleted characters one by one after performing a few undo operations.
Shortcuts to use Undo & Repeat operations
Though you can access the Undo and Repeat commands from the Quick Access toolbar, because these commands are the most frequently used commands, we recommend you memorize their keyboard shortcuts which are as follows −
| S.No | Shortcuts & Operation |
|---|---|
| 1 |
Ctrl + Z
Undoes the previous action.
|
| 2 |
Ctrl + Y
Repeats the previous action.
|
Note that if the previous action was Undo, Ctrl+Y redoes the Undone action.


0 Comments